Downloadable Web-Based I/UCRC Management Tools
From Center for Friction Stir Processing Guide
Contents |
Downloadable Web-Based I/UCRC Management Tools
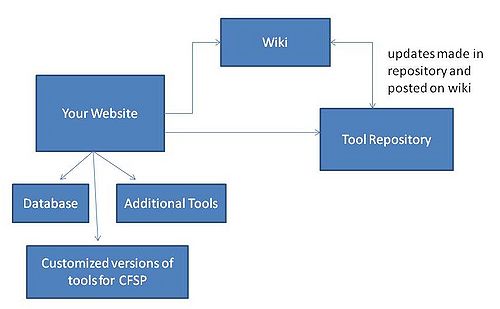
The previous chapters provided an overview of one model for managing a multi-site I/UCRC and referenced tools developed specifically for the CFSP that have reduced management overhead, particularly for the center and site directors. Upgraded versions of the tools described in previous sections will be available to all I/UCRCs by entering the tools repository link provided on the main page of the CFSP web site at http://cfsp.sdsmt.edu or at the CFSP wiki found at http://cfsp.sdsmt.edu/guide. A login can be obtained by clicking “request a login” and providing the specified information. The tools, originally developed specifically for the CFSP, are in the process of becoming generic and customizable thanks to funding from the NSF. The tools, and upgrades, will be posted as they are completed.
A center has the option of creating a separate web page for the management tools or integrating them into an existing site. The tools are currently designed to work best with a newly created web page where all page information is stored in a database and dynamically generated as needed. The new page can then be linked to from an existing web site if desired. The CFSP Web Designer tool is available at the repository to provide the user-interface portion of the new web site without the need to write code. Including links to the tools repository and the wiki on the new web page may also be useful.
At their core, the tools provide communication mechanisms between the stakeholders in the I/UCRC. The goal is to provide a professional version of a social networking site where person-to-person communication, communication within groups, and posting of information for all members is available. To complement the tools, it is recommended that a center include links to tools such as Skype or GoToMeeting to further enhance communication options. Keeping members informed of progress, questions, and opportunities has been an important focus of center management and of tool development and selection.
The Tools Repository
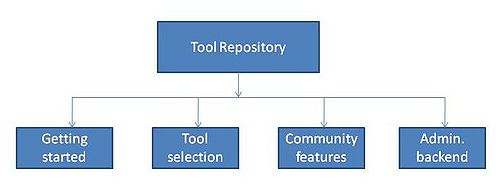
The Tools Repository is fundamentally a web site for downloading tools that also provides community interaction capabilities. The main page of the repository provides options for:
- Getting Started
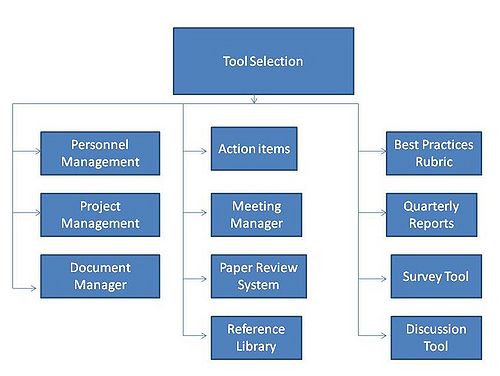
- Installing Additional Tools
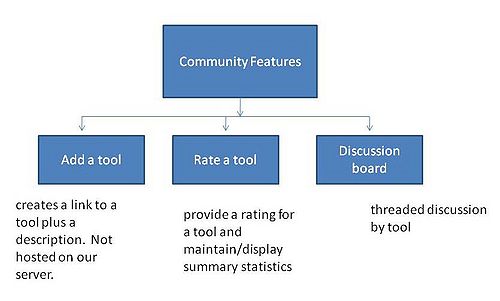
- Community Features
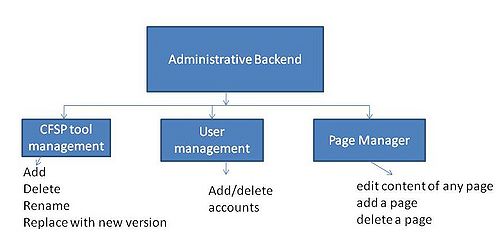
An administrative backend is also provided for the repository administrator to add pages, add, delete, or modify the tools, and manage user accounts.
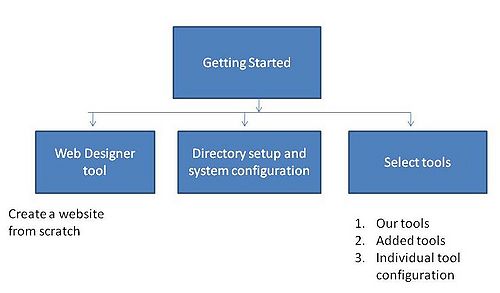
Getting started
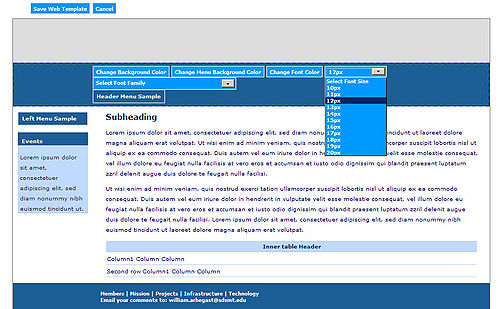
This selection gives the user the option of designing a web site using WebDesigner or creating a “blank” web site that can be customized to integrate the look and feel of an existing web site. WebDesigner contains templates, much like PowerPoint, that determine where elements are positioned on the screen. Colors, fonts, images, and menu options can be set using simple mouse clicks. In either case, the next step is the creation of the necessary directory structure and configuration of the base system. The base system, described below, is the set of functions upon which other tools rely. In addition, the database used by the tools is instantiated and configured.
The current system requirements for creating a customized toolkit are the Linux operating system (Fedora 9), an Apache server (version 2.2.9), a MySQL database (version 5.0), and PHP (version 5.2). Additional options are being investigated and will be reported in the wiki as they are verified.
Install additional tools
This section is for users returning to the site to add tools to those previously selected. Since the base system and the file system will already have been established, the installer can provide user-specific guidance on tool selection. For example, if a newer version of an existing tool is available, the installer can detect the old copy and give the user the option to upgrade.
Community features
The goal of this research is to create a community of users from all I/UCRC sites who will contribute useful tools, documents, and comments to the repository. The repository has an “add a tool” option which allows authorized users to insert a link in the repository to an external site where their tool and documentation is located. The “rate a tool” option contains a rating of the tool’s usefulness and associated comments. This will help guide future releases and inform users of tools that were found to be useful, or not, to other community members. Finally, a discussion board provides a forum for commenting on the tools and other center management issues.
Tool Descriptions
The tools described below can be found at http://cfsp.sdsmt.edu/tools_repository. A login is required to download these tools and can be obtained by clicking the “request a login” link and providing the specified information. Complete user’s guides are also available at the repository. A brief description of each tool is provided here for convenience.
The Base System
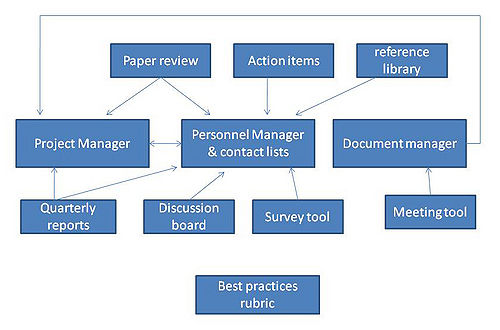
Many of the tools depend upon three basic subsystems – the personnel manager, the project manager, and the documents manager. These three tools need to be installed prior to using any other tools except for the Best Practices Rubric. The tool dependencies are shown in Figure 6.8.
Personnel Management System
This is one of the basic systems upon which many of the other tools in the toolkit depend. The primary purpose of this system is to track all center personnel. Center participants are divided into categories which define the access rights to information and sections of the web site. For the CFSP, the categories are:
- Students
- Faculty
- Site directors
- Center director / administrator
- NSF evaluator
- Industry partner
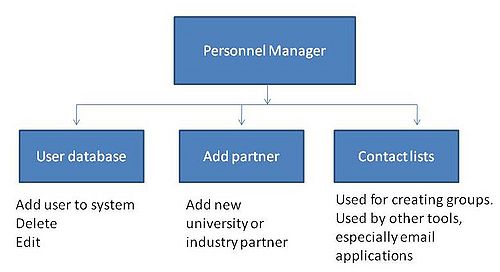
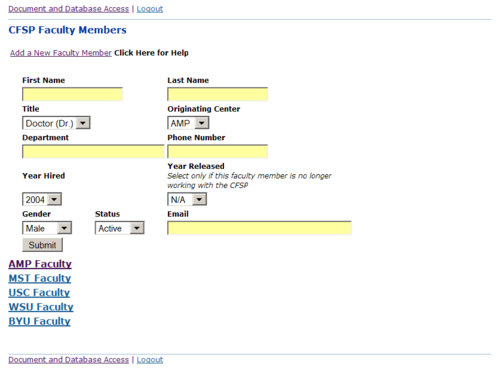
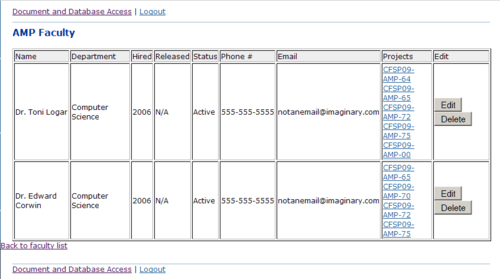
The Personnel Manger provides an interface for creating a new entry, deleting an existing entry, or modifying an existing entry. Only a person with appropriate rights, a site or center director, can perform these operations.
A person is associated with one or many projects. This can be entered at creation of the personnel record or during editing.
Entering a new center participant creates an entry in the database. These entries can be used by other tools, such as project management, and also provide a single location for all information about center participants that can be searched, sorted, and processed to extract statistics for reporting purposes. Note that adding a new industrial partner causes additional changes to the web site, such as changes to dynamically-generated menus and lists, and is currently handled separately from other additions.
An additional feature of the Personnel Manager is the ability to create contact lists. This is similar to an email list, which is one of the ways they are used by other tools, but also provides a more generic feature of defining membership in groups for managing access rights and dynamically generating web pages. Based on rights, different users will see different sections of the tools. For example, a person reviewing papers in the Paper Review System will only see the papers for which he or she is designated as a reviewer since the page is dynamically generated for that user, based on group membership, when it is accessed.
Project Management System
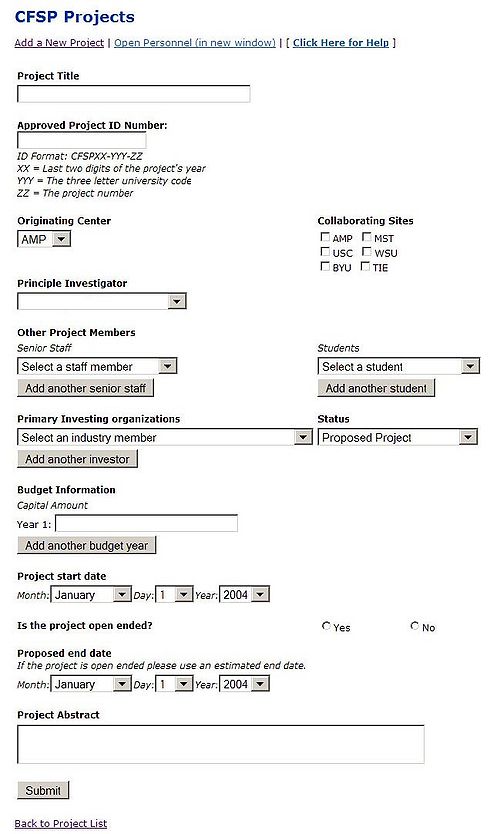
The Project Manager is another fundamental tool which is utilized by other tools. Its purpose is to track current projects for the center as well as archive past projects for future data analysis and data mining. Only a person with system administrator rights can perform these operations. After logging in, the administrator clicks on “projects” in the list of documents and is presented with the project access page that allows creating a new project or accessing an existing project.
A new project is created by clicking the “Add a New Project” link and filling in the form that is presented with information such as project title, ID number, originating center, collaborating sites, staff, budget, start and end dates, and abstract. After the form is completed, clicking the “Submit” button at the bottom of the page creates the project.
To access an existing project, click on the appropriate site to get a list of projects and then click on the desired project. The abstract, staff, and status of the project will be displayed.
Document Manager
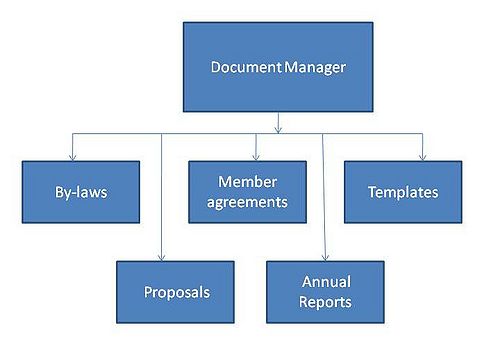
The document management tool facilitates the uploading of documents to other web pages on the site. At present, the document manager allows files to be added to the pages created for By-Laws, Member Agreements, Templates, Proposals, and Annual Reports which were described in previous chapters. The tool creates a database entry for the file with the information necessary for the dynamically-generated page to be automatically updated. The tool can be customized to allow uploads to any page on the web site with dynamically generated content. To facilitate this customization, the document manager displays a list of pages currently on the site to which documents can be added. The file name and location of the document to be uploaded are entered from a standard browse-and-upload box. Note that only a link to the document is placed on the selected page. The document itself is stored on the server and linked through the database entry.
Uploading files to dynamically-generated web pages is only one piece of the document manager. It also provides an interface for searching all documents stored in the database. Standard filtering and sorting options are available.
Additional Tools
Action Items
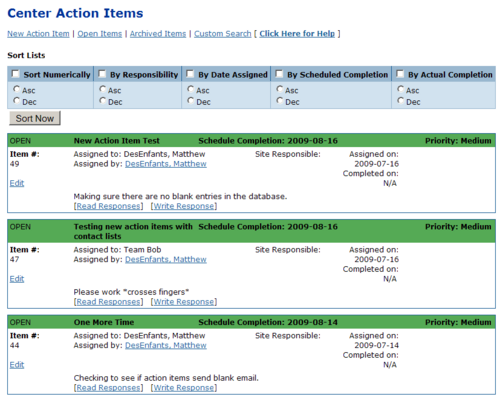
The action item system has proven effective for managing tasks assigned to center members. It provides an electronic “to do” list to center members, viewable by everyone with a login. In addition, the action item list reduces unnecessary email traffic, serves as a mechanism for people with similar issues to participate in a single solution to the problem that satisfies all needs, and allows everyone to check the progress of open items for planning purposes. The full user’s guide is available at the tools repository. The basic operations of the action item system are:
- creating an action item
- editing an existing item
- viewing the action item list
- responding to an action item
- closing an action item
When creating an action item, the user provides information including:
- Description – A brief description of the task being assigned
- Responsibility – Whom the item is assigned to. All registered users are in a drop-down list. This information is automatically included in the list from the personnel information stored in the database and managed by the Personnel Manager described above.
- Date assigned – Auto-filled with the current day, it can be changed if the action item was assigned on another day.
- Scheduled Complete – Automatically set for 1 month in the future. The person making the assignment can change that date manually.
- Completed – When the status is set to “closed” by the person assigning the action item or by a person with system administrator rights, the date the item was completed can be selected and will be saved in the database.
- Priority – High, medium, and low.
- Status – Open, closed, or withdrawn.
All fields can be edited at the time of creation as well as at a later time with the same interface.
Action items stored in the system are separated in to two categories, active and archived. Active items have not yet been completed while archived items are those that have been completed (closed) or were withdrawn. Both the active and archived action items can be sorted and filtered by predefined attributes or by using the Custom Search. All sorts provide ascending and descending options and filter by the following fields:
- action item number
- person responsible
- date assigned or click on any date to view action items that were assigned on that day.
- scheduled completion date
- actual completion date
- priority
- status
- person assigning the action item
In addition, the user can filter the action item list to search for items with characteristics not covered by the predefined sort criteria.
When an action item is generated, the person responsible is notified and can enter a response. Typical responses are that an item has been completed, more information is required, or a different person should receive the action item. Only the person who originally assigned the action item can designate it as closed. This provides a mechanism for ensuring that the action addresses the problem identified by the person posting it. A closed action item remains in the “Active” list for one month after its due date. After that time, it is automatically moved to the Archived list. If the item was closed more than one month after it was due, it is moved to the Archived list immediately. This feature places the information most likely to be of interest on the main page while providing a history for future analysis and reference.
Meeting Manager
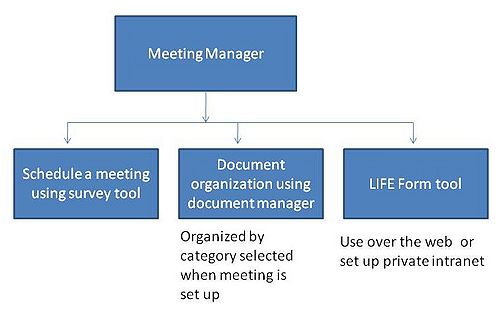
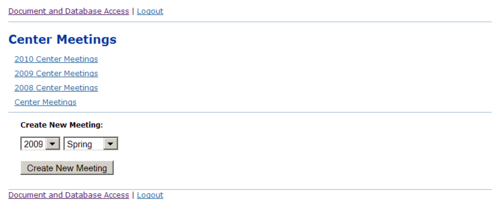
A common administrative task that can consume noticeable amounts of time is scheduling and managing meetings. As noted in previous chapters, the CFSP has two Industrial Advisory Board Meetings per year with smaller interim meetings scheduled throughout the year. The meeting manager provides the following functionality:
- A link to the survey tool (Section 6.4.7) is the first stop for scheduling a meeting. Once a contact list is created in the Personnel Manager, the user selects potential dates for the meeting and the contact list of potential attendees. The survey tool will automatically generate emails to the contact list members and collect their responses.
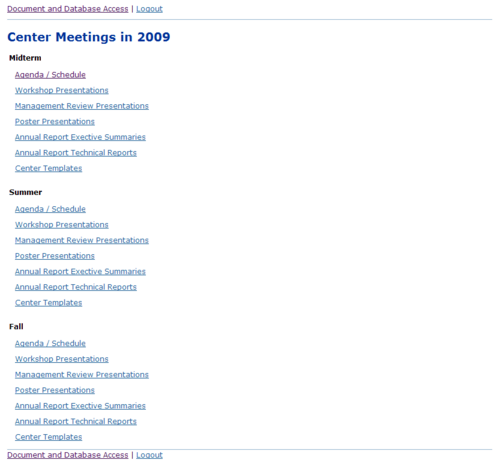
- A link to Document Setup is provided. This subsystem calls the document manager to automatically create categories of documents to be uploaded for the meeting. For the CFSP, this includes workshop presentations, proposals for new projects, technical reports, poster presentations, executive summaries of projects, and management review presentations. The content of these documents is described in previous chapters.
- A link to the LIFE form system is generated on the meeting page. LIFE forms are used to facilitate a management review of projects as described in Section 4.2.2.
Paper Review System
A likely product of center’s activities is research articles and other documents for publication. Since proprietary information may be involved, it may be necessary to have the approval of the center members prior to publishing. The paper review system provides:
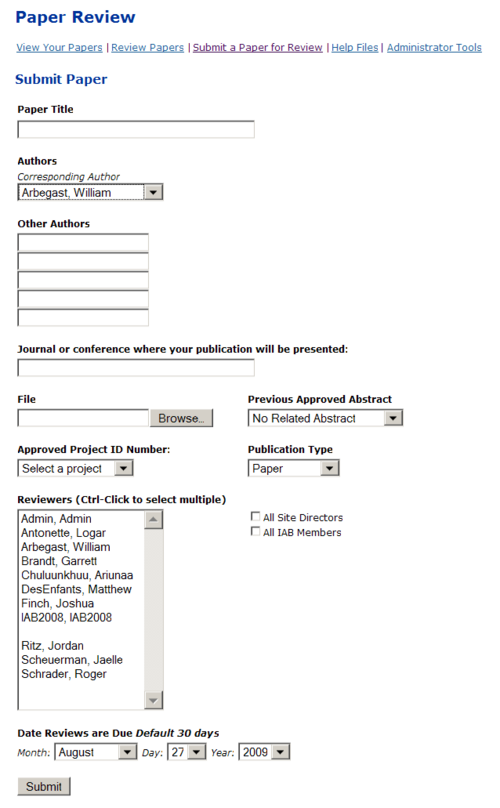
- a web page where the author can upload the paper using the standard browse/upload interface. The corresponding author supplies the title, other author information, the type of publication (abstract, article etc.), the journal or conference to which it will be submitted, and the CFSP project under which the work was done. If a previously-approved abstract is already in the system, the author can tie the two documents together at this point.
- a list of reviewers which can be selected individually or as a group, such as “all center members”. The reviewers are automatically notified via email that a paper has been submitted which requires review.
- a date by which the review must be completed with a default of 30 days. After that date, acceptance is assumed to prevent unnecessary delays in publication.
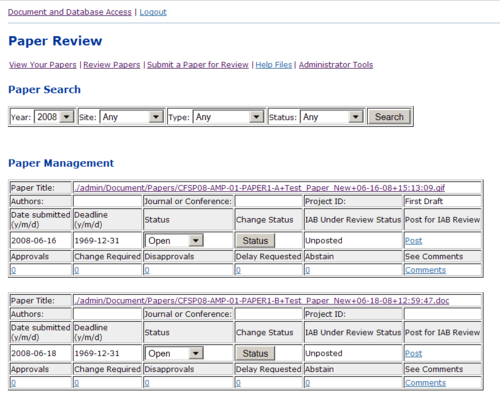
- an interface that allows the reviewer to accept, reject, or request changes. A list of reviewers, their votes and comments is available to the author.
After the author submits the paper, the site director has the responsibility to approve its posting on the paper review system. This provides an additional safeguard for proprietary information, particularly since many sites perform both center-sponsored work and direct-contract work which cannot be released to the center members. The author can follow the progress of the paper through the review paper and respond to comments as they appear. The author can also upload revisions at any time and the reviewers are automatically notified. Previous versions remain available for comparison. Email notification is sent to the author when comments have been entered for the paper and when the final status of the paper has been determined. The site director makes the final determination of the paper’s status when the review period has closed: approved, withdrawn, or delayed. If the paper is withdrawn, it remains in the database. The site administrator can also delete the paper which removes it from the paper review system and the database.
Reference Library
The reference library is a database of research articles, related to center projects, that is only available to center personnel. A user can upload a paper, search the database, and read any papers contained in the public collection. The web interface for uploading papers provides a standard browse/upload box and will accept documents in doc/docx and pdf formats as well as jpeg images. Information about the paper, including title, author(s), where it was published, the full citation, keywords, and the date published, is provided by the person uploading the paper. In addition, this interface provides the user with a list of all papers he or she has uploaded and the ability to edit the information stored about the papers. The site director also has access to change any of the data stored in the library database.
A paper that is uploaded can be for the public archive or for a user’s private library. If it is intended for public use, the site director must mark it as approved for posting. This gives the site director the ability to enforce copyright laws. Papers that are uploaded as part of a private library cannot be viewed by anyone but the person who uploaded it and site director. A third option allows the site director to make a paper viewable and searchable by only a defined set of users. This is relevant when proprietary information from one project is not available to the group as a whole.
The library tool provides the standard sort, filter, and search options, including a keyword search and the ability to see all papers in the library. If access to a paper is restricted, either because it is part of someone’s private library or is restricted to a group set by the site director, the paper is not included in the search unless the user is authorized to read the paper.
The administrative backend allows the site director to manage all documents in the library. This includes the ability to view recent uploads, sort papers, view un-approved papers, edit paper information stored in the database, and approve papers for posting with appropriate access restrictions, if any.
Although the original purpose of the library was to store research articles, it can also be used to store and retrieve experimental results and other center work products. Updates, user’s guides, and other information about this tool are available on the wiki described in Section 6.5.
Best Practices Rubric
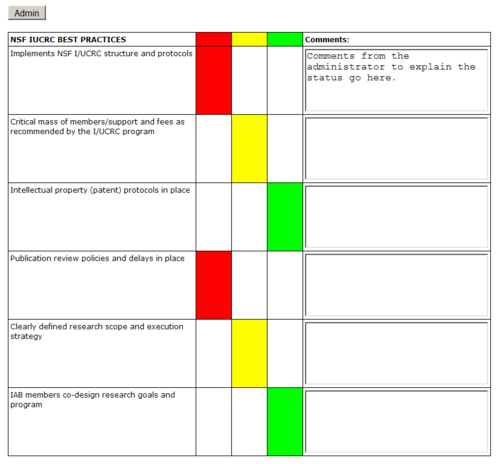
The NSF has created a Best Practices Rubric for running an I/UCRC (Section 5.2). This rubric is provided as a tool that allows an administrator to fill in the rubric to reflect the current status of the center and also change the list of best practices to better suit a particular I/UCRC. All users will be able to see the current status and download the rubric as a PDF file.
After logging in, an administrator can click on the “Best Practices Rubric” link. The administrator can then choose a color code to indicate status (red for incomplete, yellow for satisfactory or in progress, green for excellent) and also add a comment to explain the indicated status.
Administrators will also be allowed to click the “Admin” link on the rubric page to get to a tool that allows editing of the rubric to add, delete, edit, and reorder the list of best practices.
Quarterly Reports
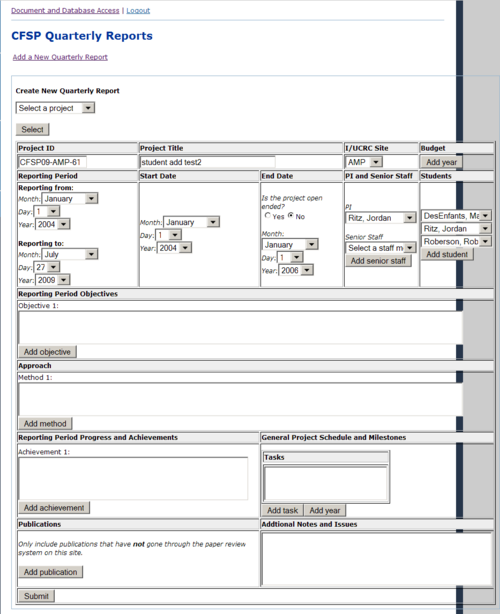
The CFSP requires a quarterly report of progress for every project. The Quarterly Report Tool provides the following:
- A web interface for entering the required information
- The ability to edit and delete a report
- A list by site to assist site directors in determining which reports are uploaded
After logging in, a user can select Documents from the Document and Database Access page to expand the list of available documents to show the link for the Quarterly Report tool. Clicking on the Quarterly Reports link sends the user to a page that accesses the tool.
To add a new quarterly report, simply click the link by that name and then select a project from the drop-down list. After the project is selected, a button appears to create the report with information retrieved from the project database. The user then makes any needed changes to the retrieved information and types in other items such as objectives, approach, and progress.
Once a Quarterly Report has been created, a link to it appears on the main Quarterly Reports page under the appropriate site identifier. This allows anyone with access to the system to view all Quarterly Reports.
Survey Tool
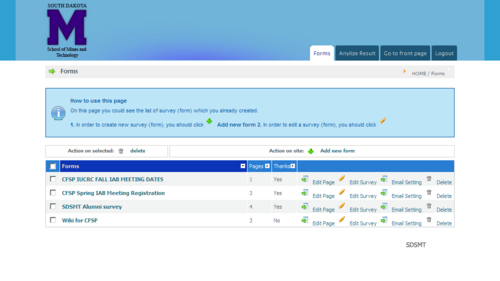
The survey tool can be used as a stand-alone tool for an arbitrary survey or can be tied to the personnel manager and contact list systems. In the latter case, email lists can be created, or pre-built lists selected, for notification that a new survey has been created. The survey tool also allows access to responses and creates a summary of the responses.
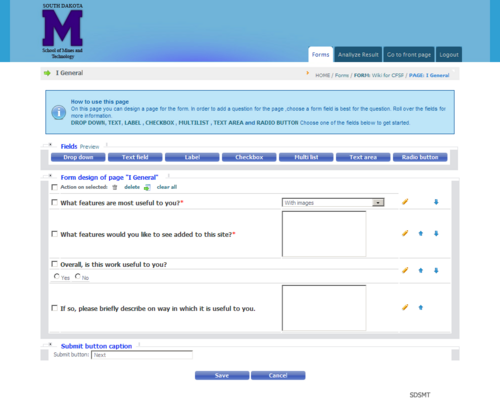
After logging in and selecting the survey tool, the administrator has the option of creating a new survey or accessing an existing survey. When adding or editing a survey, the user can add a question and select the format of the answer such as a drop down, text field, checkbox, or radio button. Questions can also be deleted or reordered.
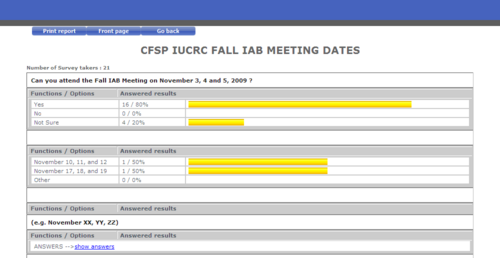
The survey tool also contains an option to view results. This can be done either as a detailed list of individual responses or as an aggregated report (example below).
Currently, surveys are accessed by simply navigating to the survey page. Future versions of the tool will connect to the contact list system and allow the sending of email containing a link to the survey to all the desired respondents.
Discussion Boards
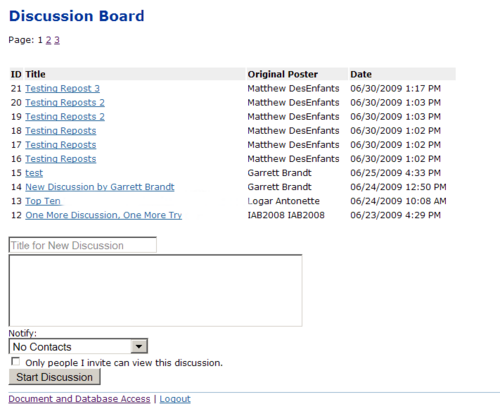
The discussion board tool is a private bulletin board for center members. A member can initiate a discussion and invite others to participate in the discussion. Only the person who initiated the discussion can add users to the board. A list of discussion topics is available for all center members to view, but only invited members can see the posting or add a posting. When initiating a thread, a drop-down menu provides easy access to all potential participants, both as individuals and as groups from the Contact List tool embedded in the Personnel Manager. A person can also unsubscribe from a discussion. All subscribers to a discussion board have the option of receiving email notification when a new post is created.
The CFSP Wiki
The Center for Friction Stir Processing (CFSP) wiki was developed to provide a forum for sharing ideas related to the management of an I/UCRC. The emphasis is on centers with multiple sites, but the tools and suggested approaches are likely to be applicable to any center. The authors of the wiki have provided policies, procedures, and practices that have been effective for the CFSP I/UCRC but acknowledge that many different models have been successful at other sites. To that end, all I/UCRC directors are invited and encouraged to provide comments and alternate solutions to the challenges addressed in this wiki. A link to the tools repository, as well as any updated information about the tools, can also be found at the wiki.
Accessing the wiki
The wiki resides at http://cfsp.sdsmt.edu/guide (aka “the book”). A link to the wiki is also available at the main CFSP web site http://cfsp.sdsmt.edu. Three levels of access are provided for users of this wiki: spectator, commentator, and administrator.
(1) Spectator access
Spectators, users who access the wiki without a login, only have rights to read the material provided in the main body of the text. Spectator access is available to the public, anyone can enter the URL for the wiki into their browser and read what is there. Viewing comments and adding additional comments is reserved for authorized users.
(2) Commentator access
Commentators have the ability to view material supplied by other commentators on the discussion page for each section. Examples include comments on the material in the main text, alternate approaches, and links to other sites that might be useful to site directors. A login is required to access these comments and to add to the discussion pages. All discussion pages are monitored for inappropriate content.
(3) Administrator access
This access provides a mechanism for altering the main text of the wiki. Only a select group of participants will be given administrator access. Administrators will have the ability to transfer content from the discussion pages to the main text as deemed appropriate.
Organization of the wiki
The main page of the wiki is a title page with a link to the Table of Contents and direct links to chapters in a navigation sidebar on the left side of the page. All users can simply follow the appropriate links to read the content of the wiki. Administrators can modify the wiki after logging in by first clicking the login link provided in the upper right corner of every wiki page. Commentators do not log in to the main wiki, they log in to the comment wiki as described below.
The wiki is actually two linked wikis. One is called “guide” (http://cfsp.sdsmt.edu/guide) and contains the main content of the book. The second wiki is called “notes” (http://cfsp.sdsmt.edu/notes) and contains comments entered by those with commentator access. Commentators can click on the login link on the main page of the notes wiki and then modify any page in that wiki. Commentators can also log in and access the notes wiki by clicking any of the “Discussion page” links in the guide wiki. A login should only be required once per browser session. Anyone who would like commentator access should contact the administrators of the wiki listed on the login page of the notes wiki.
Navigation
There are four main types of navigation: the table of contents, the sidebar, internal links at the top of each chapter, and links embedded within the text.
- Table of Contents page: The Table of Contents is reached from the main page of the wiki or the link on the sidebar. All chapter and section numbers are clickable.
- The sidebar: The sidebar is persistent, that is, it remains static when changing pages. It takes the user to the selected chapter or to the Table of Contents, the main page, or the help page. Note that the sidebar stays in the same position at all times. That means that if a long page is being read, the user will have to scroll to the top of the page to see the sidebar.
- Internal links at the top of each chapter: These links take the user to the indicated section or subsection. There is a set of internal links at the top of every chapter.
- Links embedded within the text: These links take the user to a different section, a different chapter, or a web page that is not part of the wiki.
Wiki Help
There is a Help link on the sidebar that brings up a page with basic information on navigating and editing a wiki. There is a wealth of wiki-related information available on the web, for example at http://www.mediawiki.org/wiki/Help:Formatting.
